Media Player Classic Black Edition(MPC-BE) is an open-source video and audio player. MPC-BE is a lightweight and stable video player.
It uses Microsoft DirectShow API for playback of media files.
My System Config:
- Software: MPC BE 1.6.9 x64
- Operating System: Windows 10 Pro x64

MPC-BE System Requirement: Windows 7 or later OS
First, download and install the MPC BE app and LAV Filters
- Download MPC BE: https://www.videohelp.com/software/MPC-BE
- Download LAV Filters: https://www.videohelp.com/software/LAV-Filters
MPC-BE Basic Settings
1. Set the Process priority above normal
Set the MPC-BE app to run with the CPU process priority level set to above normal. This will improve the payback of media files.
- Select the Player tab.
- Check the check box labeled Process priority above normal in the group box labeled Other.

2. Associate video file formats to open by default with MPC-BE player and add it in the context menu of video files
When various video file formats that are supported by the MPC-BE player get associated with the MPC-BE app, it will be used as the default app for playing video files in Windows OS.
Adding the MPC-BE app in the File Explorer context menu of various media file formats will help in easing up the playback with the MPC-BE app.
To do the following steps:
- Select Player > Formats tab.
- Click on the Modify button in the group box labeled Association to open a new window with Windows OS administrator-level access.

- Click on the Video button in the group box labeled Association to select File extensions of video file formats which will be associated with the MPC-BE app.
- Enable the checkbox labeled Files in the group box labeled Explorer Context menu.
- Click on the Apply button.

- In Windows 10 & 11 OS, the Settings window will open which allows the user to set the default apps.
- Select MPC BE x64 under the Video player.

3. Show chapter markers
Showing chapter markers of video files can prove useful during playback of movies.
To enable showing Chapter markers, do the following:
- Select Player > Interface Tab.
- Enable the checkbox labeled Use Chapter marker.
- Click on the Apply button.

4. Limit window proportions on resize
This setting will keep the MPC-BE app windows size in proportion to the video frame size of the video file that is being played in the MPC-BE app.
- Select Player > Window size tab.
- Check the check box labeled Limit window proportions on resize.
- Click on the Apply button.

5. Volume Step setting
Volume Step settings allow the user to set the step size (in percentage) at which the volume will increase or decrease when the volume is changed by using a keyboard shortcut or mouse buttons.
To set the Volume step, do the following:
- Select Playback tab
- Set the Volume step to 2 in the group box labelled Control.
- Click on the Apply button.

6. Speed Step setting
Speed Step allows the user to set the step size (in percentage) in which the playback will increase or decrease when done through keyboard shortcuts or mouse controls.
- The default keyboard shortcut for Increase rate : Ctrl + Up
- The default keyboard shortcut for Decrease rate : Ctrl + Down
- The default keyboard shortcut for Reset rate : Ctrl + R
To set the Speed step, do the following:
- Select the Playback tab.
- Set the Speed step to 0.1 in the group box labeled Control.
- Click on the Apply button.

7. Video Renderer Presentation mode & EVR Buffer
When Enhanced Video Renderer (custom presenter) is used as the Video Renderer, users have to choose from two types of presentation modes:
- Copy mode: This mode is standard and most compatible with the complex display and GPU setup of the computer.
- Flip/FlipEx mode: This mode is newer and less compatible with the complex display setup of the computer. Flip/FlipEx Mode Present reduces system memory usage by reducing the number of reads and writes by the Direct3D runtime for the windowed frame composition by DWM. This reduces the system’s power consumption and overall memory usage. Microsoft Windows 7 or later OS users can use the Flip mode presentation of the video. It offers better synchronization between video and audio streams. It offers faster recovery from video playback glitches. It is recommended to use this mode unless your MPC-BE app is unable to playback the video in this mode.
Enhanced Video Renderer uses Direct3D 9 Ex API to render the video.
To set presentation mode to Flip mode, do the following.
- Select the Video tab.
- Select the option Flip/FlipEx from the drop-down list labeled Presentation mode.
- Set the EVR Buffers to 10.
- Click on the Apply button.

To set presentation mode to Copy mode, do the following.
- Select the Video tab.
- Select the option Copy from the drop-down list labeled Presentation mode.
- Set the EVR Buffers to 10.
- Click on the Apply button.

8. Downscaling
Downscaling <50% setting is used to set the video down-scaling filter. It will be used to downscale the video frame when the playback video frame size (resolution) is lower than 50% of the original frame size (resolution) of the video file.
- Select PS:Hamming from the drop-down menu labeled down Downscaling <50%.
- Click on the Apply button.

9 Audio renderer settings
To set the Audio renderer, do the following:
- Select the Audio tab.
- Select MPC Audio Renderer from the drop-down list labeled Audio Renderer.
- Click on the Apply button.

How to configure MPC BE to use external LAV Filters
To configure the MPC-BE app to use external LAV Filters, do the following:
- Open the MPC-BE app.
- Select View > Options from the Menu bar.
- Select the External Filters tab.
- Click on the Add Filter button.

- Select LAV Audio Decoder.
- Click on the OK button

- Select LAV Audio Decoder in the External Filters list.
- Select the Prefer.
- Click on the Apply button.
- Click on the Add Filter button.

- Select LAV Splitter.
- Click on the OK button

- Select LAV Splitter in the External Filters list.
- Select the Prefer.
- Click on the Apply button.
- Click on the Add Filter button.

- Select LAV Splitter Source.
- Click on the OK button

- Select LAV Splitter Source in the External Filters list.
- Select the Prefer.
- Click on the Apply button.
- Click on the Add Filter button.

- Select the LAV Video decoder.
- Click on the OK button

- Select LAV Video Decoder in the External Filters list.
- Select the Prefer.
- Click on the Apply button.

Configure the LAV Filters
- Configure LAV Video decoder
Users have the option to enable the use of Hardware decoders to decode video files. options avaibale for Hardware Decoders are:
- DXVA2 (copy-back): DXVA2 API is used to decode the video in copy-back mode. With copy-back implementation, the decoded video is copied from the GPU memory back to the CPU’s memory.
- DXVA2 (native): DXVA2 API is used to decode the video in native mode. With native implementation, the decoded video stays in GPU memory until it has been displayed. The video decoder must be connected to the video renderer with no intermediary processing filter. The video renderer must also support DXVA.
- D3D11: It uses Direct3D 11 API to decode the video. It supports both native and copy-back modes. It is usable when the GPU supports Directx 11. Users are recommended to use this mode if it is available.

To configure LAV Video Configuration, do the following:
- Open Windows OS Start Menu.
- Find and open LAV Video Configuration.
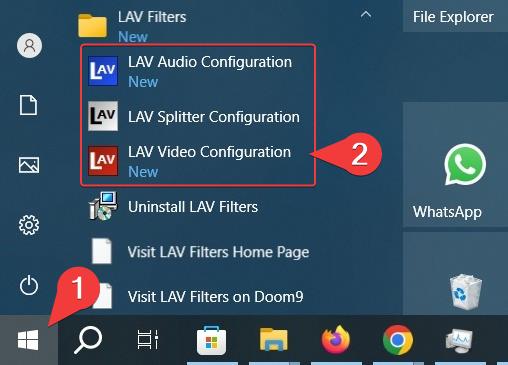
- Select D3D11 from the drop-down menu labeled Hardware Decoder to use.
- Click on the Apply button.

MPC-BE Other Useful Settings
1. Keep the MPC-BE app window at the top while playing video files
Users have the option to keep the MPC-BE app window on top while playing a video file. It is useful in keeping the video frame always in view while playing a video file in the MPC-BE app.
To enable this feature, do the following:
- Select View > On Top > While Playing Video from the MPC-BE app menu bar.

2. Auto Volume Control
The Auto Volume control feature is useful in the playback of media files in which the audio level is very low. This feature increases the volume level of certain frequencies in the media which is low.
Boost Audio feature increases the level and clarity of human voices in the media file. This is useful when the human voice is not clear during playback.
To enable this feature, do the following:
- Select Audio > Sound processing tab.
- Enable the checkbox labeled Auto volume control.

3. Source Filter Buffer Length
The buffer length setting of the Source filter lets the user set the length of the buffer (in seconds) which is used to store the audio and video data stream from the media files in the buffer.
To set the buffer length size, do the following:
- Select the Internal Filters tab.
- Set Buffer Length to 5 sec.
- Click on the Apply button.

Reference
Related Articles
- Media Player Classic Black Edition (MPC BE) + External LAV Filters
- MPC-BE app + External MPC Video Renderer
- Media Player Classic Black Edition Menu Bar Options Guide
- MPC BE app Player and Playback tab settings Guide
- MPC BE player app Video, Audio, and subtitles tab settings Guide
- MPC-BE app Subtitle & Audio track loading, selection, and syncing Guide
